As you saw in part one, greenhouses can enable you to grow more of the crops you want by extending your growing season and giving more control over environmental variables like pests and temperature.
We started with simple double-layer hoophouses for our first commercial greenhouses. We ordered our kit and put it together ourselves, although some companies will offer installation as a service.
If you’re considering a DIY hoophouse of your own, you’ll want to know what installing a greenhouse covering takes. Here’s a quick guide on the steps to putting the hoophouse together and tips to make is as frustration-free as possible!
Building a greenhouse (part 2)
In this video post, we’re talking about:
-
- The best way to install your plastic greenhouse covering
- Securing coverings with wiggle wire
- An affordable method for inflating coverings
The best way to install greenhouse plastic coverings
First things first, when you’re putting the covering on your greenhouse, make ABSOLUTELY sure there is NO WIND! The last thing you want is to see your investment ripped to shreds or one of your friends getting pulled off a ladder trying to get the cover over your greenhouse structure in wind. Even 5-10 mph can turn this potentially fun task into a VERY BAD DAY.
The proper way (or at least the best way we’ve found)
STEP 1
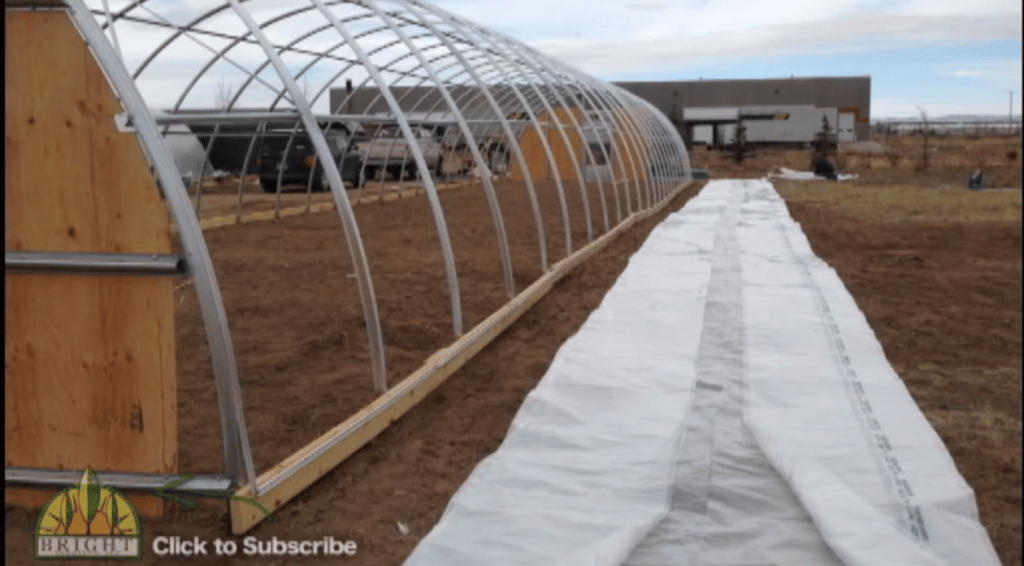
Once you unpack the box your cover roll came in, begin stretching it out in front of your greenhouse structure. Be careful as you unroll it and straighten the covering out you don’t overstretch certain segments or drag it across any rocks that may cause damage.
STEP 2
Depending on the type of covering you choose, there may be two separate plastic pieces. We highly recommend the double layer poly greenhouse coverings with an IR and anti-condensate coating for maximum heating efficiency! In fact, we use a double layer 6 mil polyethylene covering in both of our greenhouses. We like the kind with infrared and anti-condensate coatings, but these are more expensive.
BE SURE you have the correct sides facing down or risk losing any benefit these coatings may provide you.
STEP 3
After the covering is fulling stretched out in front of your greenhouse, coated sides down, pick up the edges along the greenhouse and fold them over so that the bottom half of the fold has the coated sides facing down and the top part of the fold has the coatings facing up. At this point the fold should be facing the greenhouse. At this point, I hope you’ve enlisted a few friends (3-5 will do) to help you because these coverings can be fairly HEAVY.
STEP 4
After doubling the covering over, have your friends take their places between the greenhouse and the covering. You’ll need at least one on each end, with a few scattered equidistant along the greenhouse. Make sure your buddies in the middle are comfortable on a ladder – we chose the ones who spent time in circus school… Make sure the others have poles without sharp ends. We use lengths of 2-4 inch PVC pipe, or 2x4s for this.
As a side note: the smaller your greenhouse, the simpler this process will be and the fewer friends you’ll need. But remember, the opposite is just as true! Once in position, have everyone grab the covering and begin to pull it up and over the greenhouse structure from the ends (people standing on the endwalls) and the middle (your guy on the ladder). You’ll continue to work the covering up being careful not to over stretch it as you pull. While the folks on the sidewalls and the ladders are pulling the covering over, we like to have one or two friends help push it up from the ground; first with their hands and then with a longer blunt object (like a 2×4 or large diameter PVC pipe) as to not puncture the polyethylene. If you’re worried about poking a hole in the plastic, put some duct tape around the ends of the poles. Continue to work the covering over the arches until you’ve reached the half way point.
STEP 5
Once the covering is half way up, simply pull the folded half the rest of the way over to drape down the opposite side from which you began pulling it. There’s a lot of friction between the heavy, coated covering and the structure, so doing it this way minimizes the amount of dragging you’ll have to do.
Nice work! Again, this may require some tricky ladder work and some 2×4 magic. Pull the covering all the way over until it’s fully covering the greenhouse arches and you’ve got your covering on!
Covering [6:10]
Before you even begun stretching your polyethylene covering over your greenhouse structure, you should have installed some aluminum wiggle wire channel or “spring lock base channel” along the baseboards and over each endwall.
The easiest way to attach this channel to your greenhouse is to use self-tapping screws/bolts depending on if you’re working with wood or metal frames. To be safe, screw/bolt your channel into the frame at least every 18 inches. Working from one end to the other, begin securing the wigglewire into the channel. NOTE: Use the PVC coated wigglewire! Save yourself the heartache of seeing your plastic covering rip from the jagged metal edges of non-coated wigglewire. It will really pay off if you have to remove your wiggle wire frequently. PVC coated wigglewire won’t cut your plastic. Bare steel will. As you work your way down from one end to the other, try to keep the covering relatively taut. You’ll want to avoid bunching it up and causing yourself future headaches down the road. Once you get to the opposite endwall from which you started, try to pull the covering as tight as possible before securing the last few sections. After you’ve got the plastic covering secure all the way around your greenhouse, you’re ready to inflate it!
Inflating the greenhouse covering [2:44]
After your double layer polyethylene plastic coverings have been successfully installed and secured, it’s time to put them to work! Creating dead space between the sheets of plastic gives you incredible insulation value very inexpensively.
We like to take a very energy efficient blower that sucks air from inside our greenhouse and blows it in between the sheets of polyethylene. You might be wondering: “Shouldn’t you be pulling air from outside your greenhouse to avoid excessive humidity damage?” In response to that, we would say: “Yes! That is completely acceptable to draw in outside air. However, our conditions are less than ideal for drawing in outside air. As we’ve mentioned in the past, we tend to get some fairly ferocious winds in Southeast Wyoming which would cause our blower to draw in all kinds of grit and debris that would negatively impact it’s function.” Wherever you decide to get your air, the main thing is that you’re creating sufficient dead space to keep those plants warm! — We hope this video has helped you think through the steps of putting on your own greenhouse covering. Please be sure to subscribe to our YouTube Channel or leave a comment below!
Don’t forget to check out “Building a Greenhouse (Part 3)”
Looking for a greenhouse bundle? Look no futher.
Maybe you want to start a hydroponic farm in a greenhouse, but the thought of sifting through sites and numbers to find the right greenhouse and equipment matches sounds like an ordeal.
If you want to look at a Greenhouse Bundle common for small commercial farmers, check it out below.


